Welcome!

How we came to purchase our home.

WPA Photo

A Works Progress Administration photo offers a glimpse of our home's past.

Reproduction Windsor Chair

Finally, a dining room set.

No Power, No Heat.

Our first snow storm and it's aftermath, October, 2011.

Lead Poisoning

Updates to our son's lead levels.

Bit By Bit

My wife's blog on being pregnant, giving birth and raising our first child with all the complications, hardships and joys that life throws our way.

Wednesday, December 25, 2013

Parlor Renovation, Part I

August 4, 2012...

"OK!  I know it looks bad, but it looks worse than it really is.  I swear!"

That's the only thing I could say to my wife when she came into the parlor.  It's only a hole in the wall, right?  A frown, and the look of "what did you do now" was the kindest of greetings one could receive...

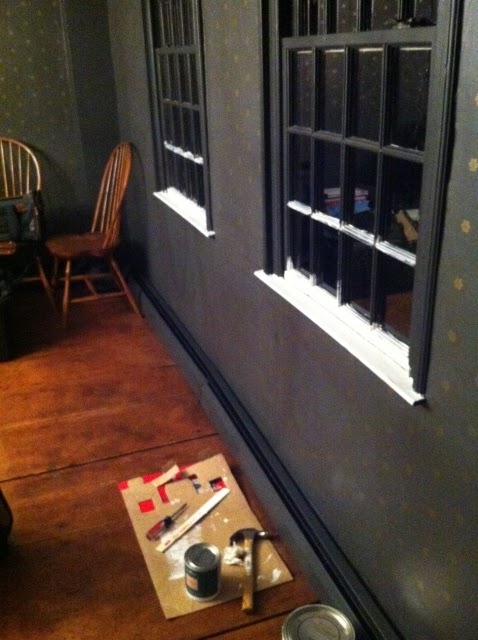
From the survey of our parlor, a rubber-cement glued wallpaper could be seen hiding the water damage plaster underneath (thanks to the previous owner).  As I peeled away the God-awful wallpaper, I opened a can of worms....the wallpaper was holding together the damaged plaster underneath.  In my unknowing nature at that time, the "loosened" plaster fell out and I had continued to remove what I had thought was damaged plaster resulting in a gaping hole in our exterior wall.

Before , left:  Rubber cemented (and painted) wallpaper.         After, right:  Wallpaper removed, punky plaster exposed.


Wallpaper removed, "loose" plaster gone (lathe saved) and the window trim removed (some damaged), I found myself dug deep into a pit.  My knowledge was limited, my hopes high.  I wanted to do the work myself, pride took the better of me.  I continued to knock "loose" the surrounding plaster away.  In the end, I was left with an annoyed wife and crushed pride.

More wallpaper being removed, wetted areas are now visible below the window.


Without the knowledge to repair my deeds, the wall sat there for the remainder of the summer, fall, winter, spring... yes yes, and then summer.  I must have sub-consciously buried the plan to have it fixed for each time I said out loud to my wife that I am busy and can't do this or that right now, she would interject and say, "Like the hole in the wall?" It was painful to have to be reminded of my error or lack of ability.

I removed the wall paper entirely, along with the two sashes, sill, molding and punky plaster.  Notice the solid piece of wood at the window sill height that is where the original chair rail would have been.
August, 2013...

I had a plan (in my head).  I needed to learn how to do repairs on my own home yet books only showed vague interpretations of other jobs but I am a visual and hands-on person.  My plan was to contact Mr. Sunderland of Sunderland Period Homes.  I had the idea that since he's employed several talented persons, perhaps I could hire but one to show me how.  I wanted to learn how to do this and that and thought that perhaps I could "rent" one of his carpenters or plasters for a day to show me the ropes.  An email was sent off.

View from the southeast corner of the home towards the west.  The window is just west of our coffin door.  Notice the slight bump that is just below the window.

South exterior wall.
South exterior wall, window and coffin door.
Mr. Sunderland was confused by my questions and request.  He asked to come over and I can surmise that his trip was to evaluate a future job as oppose to a learning experience for the home owner.  We spoke of several topics while he was at our home including making our coffin door functional, adding a chair rail, siding, identifying a possible structural issue below the window... oh, and yes, the window and plaster mess yours truly created.  The idea of instruction was thrown out the window very quickly as Mr. Sunderland was too confused (perhaps on purpose) to follow.  So, we discussed how he would repair the window and bring it to new (along with the aforementioned items).  As I walked Mr. Sunderland to his car, we discussed a budget.  After pricing out how much a new window was from a few sources, to include the sashes and frame, (minus installation) I figured that a repair for such a window would surely not cost anywhere near the estimated $2,000 for the uninstalled package.  Considering our finances, my wife and I decided that $2,000 seemed a reasonable maximum amount to repair that plaster wall, reset the window sashes and stop the water leak.  Mr. Sunderland nodded as if he understood, yet said that it may be a bit more.  It was a one hour chat and an email to follow within the week that blew my mind, and not in a good way.


Here was the estimated total (are you ready for a jaw drop?):  $6,800.00

My mouth dropped open, I even imagine a bit of saliva dribbled out as I was dumb struck.  My wife had to cover my child's ears as, in my delirium, extraordinarily colorful words expelled from my drooling mouth to such extent that my opinion of Mr. Sunderland dropped dramatically.

I emailed/called Sunderland Period Homes to explain to me why it would cost nearly $7,000 to fix a leaky window and patch the plaster?  Here was his response, in layman's terms:

$2,600 is for the chair rail restoration.  The rail had been removed by a previous owner and replacing it would bring the room back to an original appearance.  The cost included the materials and labor which involved scribing the wood chair rail to match the uneven plaster wall along three walls (the fourth being paneled).  I'll pass on a scribed chair rail, saving myself 30% of the estimate upfront.

$600 is for removing paint from the existing reproduction sashes on one window.  Ah, thanks, but I'll spend a few hours over a weekend doing that myself...

$400 is for weatherstripping the two existing reproduction sashes.  What?!  It costs less than a dollar a foot to purchase!  There's no way that labor could be that expensive!

$3,200 is for (quoted from the estimate):

  1. Flash the header window with lead.
  2. Attach wood lathe properly under the window.
  3. Plaster over existing lathe.
  4. Re-install sash and window trim.
  5. Remove exterior storm window.
  6. Strip paint from exterior window frame.
  7. Restore shape of exterior sill.
  8. Remove siding at left, right and beneath window to assess condition of sheathing.
  9. Install new 30 lb. tar paper around and under window.
  10. Install "ice and water" for water proofing around window.
  11. Caulk edges around window frame and re-install siding with rosehead nails.

In addition to the above items, he wrote up an estimate for "custom made interior storm windows" to replace the exterior aluminum units currently installed, restore the clapboard siding and restore the coffin door.  The other estimates combined grossed around $46,000.  All I wanted was to stop the water leak, but at least I can see where Mr. Sunderland's pricing is in other aspects.

I bit the bullet.  I signed a contract with Sunderland Period Homes for the $3,200 + (and yes, plus the outrageous $400 for weatherstripping).  I must seem insane to you, honestly though, I have a reason.  After asking for references, I spoke with a few of his former and current clients.  They all shared one answer.  He is insanely expensive, but he gets the job done right once.  This gave me an idea.  I figured, if I am paying an excessive amount of money for this small job, why not be present, mentally record what would be done and, replicate it on the other 20+ windows that need some sort of repair.  The work will be done for me and I'll be educated in how it's being done by a qualified crew.

My readers, when the job is complete, and time allows, look for a how-to for waterproofing and restoring a leaking 250+ year old window and frame (to be updated in 2014).

Side note (but important):  After the fiasco with my son's lead levels, I decided to take a sample of the underlying paint from our parlor's newly exposed surfaces.

D-Lead test samples.
The test came back negative.  It is assumed that while removing wallpaper, I had inadvertently released this trace amount of lead into the air.  I can rule out this room as being a cause for the lead in my son's system.  See this post:  Lead Poisoning, for the full story regarding lead issues.

Sunday, October 6, 2013

Rice Cakes

They're delectable, aren't they?  Unwrap the plastic bag, pull out this wafer of Styrofoam, take in a sniff of that caramel or that artificial sea salt scent and savor the texture and feeling of eating a rice cake.  

Ok, most of us don't really do that.  In fact, if you were like me, you'd rather reach for any other treat besides flavored rice cakes... unless your a ravenous mouse intent on being an organic flotation device.

Yes, they've returned.  These pesky rodents just love an old home and rice cakes.  Having had rats as pets in high school, my wife (OK, me too) is (are) hesitant on ridding our home of mice using poisons, especially with one and a half children running around.  So, instead, we purchased a mouse trap that takes care of the deed and seals itself upon contact.  No mess, just throw the whole container out.  Much better than the "instant" (as in instant death) chocolate milk-like powdered bags filled with poison that our predecessor left for us to find.  

This past month, while entertaining our son, a whiff of death emanated from the floor boards.  The smell was similar to one of my first posts where a rather large carcass of a mouse (perhaps mouse-rat hybrid) was stuck under the bathroom vanity (What is that Smell?).  The whiff was so putrid that being downwind was enough to make me seek it out.  

I ventured into the basement, trying to sniff out the tell-tale scent.  No luck.  There was no trace of the scent, there was a dried dead mouse, yes, but the strong pungent smell of death was only present in the keeping room above, not in the basement.  After throwing out the dried fuzzy-wuzzy, I brainstormed.

My next thought was that the putrid relative of the dried fiend was trapped in the insulation, much like those discovered previously (Surprise in the Insulation).  I went at it (again).  I took down the insulation that I had replaced.  To my dismay, bay after bay of secure insulation was ripped down in search of that deathly critter.  Again, no luck!  After taking down all the insulation, there was no sign of it!

I returned back to the main part of our home, itchy as all hell, with no discovery to report.  So we sat there, in the keeping room, on our couch, smelling rotting flesh.

Then, it occurred to me.  Could it be possible that a mouse was lurking on the ground floor, crawled into the couch, got stuck, and died?!  Oh how nasty!  Just the thought was making me want to vomit, not to mention, throw out our nearly new couches.  I tore apart the couch.  The smell was there, but not.  It kept coming and going.  I gutted the couch cushions.  Every last bit of polyester stuffing was gone.  Once the couch looked like a deflated balloon, I thought, I would find something, the smell was just that strong.  I used a shopping bag wrapped around my hand as a precaution.  Here's what I found:

A big fat NOTHING!

We could still smell that putrid scent.  At least its not from the basement or the couch.  The wall, however, had the strongest smell.  The wall directly behind the couch, the only wall to have the original windows still in place.  I followed the scent but there was nothing under the baseboard, outside the window or in the window.  

It's been a couple weeks and the smell is long gone.  The corpse was never found.  I doubt the critter awoke like a zombie and left searching for it's next meal.  My best guess is that the rodent was hiding somewhere in the foundation sill when it died.  Either just under the clapboards on the outside or in one of the baseboard plumbing chases that were drilled through from the basement side.  I guess the only comfort is that the smell is gone, for now.


Then come the noises.  Oh, you thought I was done?  No, there are now noises.  Behind the keeping room's fireplace paneling last night, we heard a scurrying.  Yes, a fat mouse had gotten wedged as it was climbing the bricks behind the paneling.  I was able to peer behind the panel but was unable to see anything so I assume he's now relaxing somewhere above.  


Also, at night, while sleeping, sometimes, we hear the furry beast munching on a nut over our heads.  The attic, much like the floor above the keeping room is hollow.  The floors are roughly eight inches plus in depth, a playground for these guys.  I fear that I may have to pull up all the floor boards in the attic, search out any openings up there, put in new un-compressed insulation and reseal.  Then, the same thing for the basement.  I should also go around the perimeter of the home and find any other openings.  I'd really hate to start putting out poison...

Tuesday, August 13, 2013

Nightshade

We've all been taught at some point to be wary of wild berries.  Boy/Girl Scouts teach the basics of wildnerness caution.  Parents who are aware of such things do so as well.  But what if your nature experience is limited, never having becoming one with earth?  Despite the commercials showing Wild Berry Passion as the flavor of the moment, there's nothing flavorful about poison berries.

Several months ago, in glee, my wife and I planted grape vines purchased from a local discount grocery chain.  A few weeks ago, my wife spots grapes growing for the first time.  She becomes quite excited and shares a photo of the newly formed grape to her social media network.


While waiting for our little grapes to ripen, my wife noticed that these "grapes" looked funny.  She accidentally knocked a branch off and tried to save it by placing it in a glass in our kitchen.

Looking closely at the orbs, she searched online for immature grapes with nothing looking like these solid green balls.  Eventually, she realized that this plant is not part of the grapevine where she found it, but instead a part of a deadly poisonous weed called Nightshade.

It's "berries" are jambed full of tiny seeds, one plant can produce 80,000 seeds!  The seed pods and leaves are poisonous.  Some "herbal people" harvest them fort their  "medicinal" properties.  As we're not shamans, we've plucked out as many as we could after discovering their true identity.  They were growing next to the vines of our grape plants so hence my wife's confusion.  In fact, they were found next to our back door, around our rose bushes, by the coffin door and randomly throughout the perimeter of our backyard.

I curse the previous owner for being so lax with her yard maintenance:  free growing poison ivy/oak/sumac and poisionous nightshade should be against the law.  They all spread easily and, with a ripened nightshade looking like small berries in reds and dark blues (green, unrippened), they appeal to children.  With my little guy sticking whatever he can into his mouth to taste, you can imagine our fear with having him in our back yard.

Nightshade, specifically Black Nightshade, causes these symptoms:

Your mouth dries up and your pupils dilate.  You get diarrhea and vomiting along with obvious stomach pains.  Your pulse either sky rockets or plunges and some people go into shock.  Your breathing slows as well.  Next, you get a fever and start to hallucinate (hence the "medicinal" property). Your hands go numb, you get a headache; worse yet, some go paralyzed.  Oh, and your whole body sweats.

Sounds great, doesn't it?

Good news is, these plants are pulled out easily.  Their roots are shallow, wear gloves as a precaution, grab the base of the stem and pull it out.  It may even be better to place a plastic bag over it so that none of the seeds fall off.  Place the plant directly into a covered trash can to ensure the least amount of exposure to others and thrwart birds seeding the yard.  Thoroughly wash your hands afterwards.

I went a step further and warned my immediate neighbors.  They have a child and dogs.  And for my pet chicken owners, Nightshade seems to cause irritation in very small quantities but most chickens seem to know to stay away.  But, in large quantities, it can cause eventual death.

Lead Poisoning

My son, a walking, talking little bundle of joy reached his first birthday on June 27.  The following week, we visited our pediatrician for his first annual check up.  It was at this time that a lead test was given for daycare and perhaps per state regulations.  A finger prick was all it took for the screening.  A reading of 5.4 micro grams per deciliter was found.  The fact that anything came back was a shock since we had thought there wasn't any lead in our home.  With a reading of 5.4 mg/dL, we began to panic.

The Environmental Protection Agency (EPA) had a "level of concern" for any child under the age of 6 years who's blood lead level (BLL) was above 10 mg/dL.  In 2012, that level was reduced to 5 mg/dL.  A full blood test was ordered for our little man the following Monday.  A couple days later, the results were in.  His actual BLL was at 11 mg/dL.  The doctor actually apologized to us because she said she would have to inform the State.  We had no idea what that meant.  Could it mean that the State will come and take our child away?  Are we horrible parents for wanting to live in an old house?  Could we go to jail for child endangerment?


While waiting for "something" to happen, we went out and purchased over $100 worth of additional lead test kits to locate any source we could.  We purchased the following:

3M's LeadCheck Instant Test Swabs $9.97 for 2 test pack (times 3).
Klean Strip's D-Lead Paint Test Kit $28.97 for 6 test pack (times 2).
PRO-LAB Lead Surface Test Kit $9.98 for 6 test pack.
First Alert's Premium Water Lead Test $10.67 for 1 test pack.
Klean Strip's D-Lead Paint Surface Cleaner $6.97 for a 32 oz. bottle.

I wanted to find every trace of lead that I could find.  With the above tests, however, the following was discovered:

The keeping room was tested extensively.  It was the main room where our son spent the majority of his time.  The walls, ceiling, floor nails and random splats of paint came back negative.  I used the D-Lead Paint tester for all painted surfaces.  I then used the LeadCheck sticks for random spots.  I didn't have enough for everything, but I tested what I could with those.  The only light fixture in the room was tested, and boy did it come back positive.  Some of the black painted surfaces had chipped away and exposed the tin underneath.  The theory was, since the light was located in the direct path of the A/C, dust either on the lamp or being blown by it, becomes leaded and rains to the floor.

I made it a priority to remove that light.  A run to my local big box store was made, purchased a lead-free replacement and exchanged the two.  I removed the old light by first gently wrapping it in a plastic bag, unscrewed the decorative plate from the ceiling, detached one wire at a time placing a nut on it for safety relocated it to the porch should the State require it for any reason.  I then used the D-Lead cleaner to wipe down the ceiling and floor beneath just in case.

The replacement light was installed rather easily and actually doesn't look that bad.  It even has the ability to point up or down; currently it's pointing up for maximum light.


As noted in a previous post (Lead Testing), our exterior paint is leaded.  The interior was not, as far as I could tell at that time.  I traveled around the house, this time, taking more samples using the above swabs and sticks.  The original hardware in the home, i.e. door latches, came back positive for trace amounts of lead.  The HL hinges as well.  A lamp in our old kitchen, highly positive.  Who would've thought?

Concerned, I started calling many agencies, offices, and contractors.  I knew that lead abatement is not cheap but learned that there are programs that can assist a home owner.  That was my goal:  finding assistance in locating the source and eliminating it.

I Googled lead testing companies.  These hired groups use a hand held scanner called an XRF device that can scan down through 36 layers of paint, locate lead and calculate the concentration.  I received estimates from $800 to $1,200 to scan my home plus the cost of additional types of tests like dust swabs.

One company, a prospective lead inspector, mentioned a financial assistance program existed at the Connecticut Children's Hospital called LAMPP.  He had suggested that I try contacting LAMPP since he'll get their business anyway and perhaps because he can charge the full rate as opposed to an individual rate for me.  I did not care what went on behind the scenes, we were worried for our son but if the scanning can be done for free, why not? ... So I thought.

LAMPP is a grant based assistance funded by HUD for lead abatement.  Being a grant, our out-of-pocket expense would have been minimized or none at all, according to the inspector.

I became quite excited.  I called the LAMPP program director but no answer. I called another number and left a message and I waited for a call back...

Meanwhile, I received a call from a doctor at the Connecticut Children's Hospital.  She was called by our pediatrician to help answer our questions since this particular doctor was an expert in lead poisoning.  Our conversation was long and we learned that the majority of lead was found in the form of dust, not paint chips.  She told us to stop vacuuming as it may spread the leaded dust around and to wet mop our floors weekly.  Every weekend now we use a wet swifter mop to wet mop our 200+ year old floors. I mentioned the LAMPP program to the doctor on the phone. She personally knew the director and said she'll have him contact me.
Within 10 minutes, he called.

The director had plenty of knowledge of his program, as he should.  He essentially said that I do not qualify for assistance as I did not match the majority of the eligibility criteria:

1. Have a child under the age of six.  
Check!

AND

2.  The home would have to be built before 1978.  
Double Check!

AND

3.  The home is located in a pre-approved city/town.  
My town is not listed.

AND

4.  For a family of three, the combined income must be less than $58,500 ($65,000 for a family of four).  
I guess I'm too rich?

AND/OR

5.  Have a child on Medicaid.  
He's not and we're also not on welfare.

OR, IGNORE ALL THE ABOVE AND:

6.  Be in Section 8 housing, earning a combined maximum income of $38,500 for a family of three.  
See Nos. 4 and 5.

Needless to say, I wasted days of research and phone calling for nothing.  I am too "rich", located in a "prosperous neighborhood", able to afford our own health insurance and own our own home without any government assistance.  I pay into the system so that other's can take advantage of it...

HOWEVER....

My wife was able to get somewhere with the State's Health Department.  We were directed to our town's own "Registered Sanitarian".  Honestly, I thought I was communicating with a licensed garbage man?  I never thought such a title ever existed.

I contacted this "Sanitarian" thinking that perhaps, since he's from our town, we may be able to find assistance for abatement (this ended up being a mistake).  He requested a copy of our son's blood lead levels and wanted to conduct a walk through with his supervisor.  Great, we thought!  We're making progress.  Perhaps we can get a grant to get rid of all the lead!

They came, and pointed out the gaps in our floors.  They started to explain lead dust and that a packet of sugar sized lead dust is enough to cause permanent brain damage.  Imagine my wife's dismay... They added that we should purchase an EPA certified HEPA vacuum (around $500).  And were warning us that official testing for lead could lead to unintended consequences.  What does that mean?

Our parlor is in the midst of repair with damaged plaster and a window off it's frame (it's an ongoing project that I'll have to elaborate in a later post).  They saw the window framing exposed, the planks as well, and started indicating that I was poisoning my son.  They also started to roll their eyes when I described my job:  engineer currently working near bridges being painted = assumed lead paint.  It's really a brand new bridge, for the record, so no leaded paint.  They left after a 15 minute tour then promised to come back a week later to swab for leaded dust.  Before they left, however, they asked me to seal the parlor up, just in case.

Their return was witnessed by my wife who saw them take a sample from the floors of the old kitchen below that old leaded lamp (since replaced - see below), the parlor, the dining room and our son's bedroom floor.  They also swabbed one window sill in the dining room.  The window swab was more of a proof that the lead is infiltrating into the home from the outside.  The sanitarian proceeded to open and close the sash, then swabbed the sill.

Upon inspection when I got home that day, there's a white layer of paint underneath the horrid dark green/blue present on the sill.  There was also tiny pigments of pink and sky blue.  These were all in a track of peeled up tape from our weatherization routine (Getting Cold...).

For the record, I've never tested that particular window sill for lead, just the similarly colored trim around one of the two doorways in an area most frequented by my son, the keeping room.

A week later, the swab tests came back.  Any concentration of lead particulate above 40μg/sf equates to a red flag (that's 40 millionths of a gram of lead per a square foot):

Dining Room        less than 20.0 μg/sf (undetectable)
Baby Room          less than 20.0 μg/sf (undetectable)
Front Entry        less than 20.0 μg/sf (undetectable)
Old Kitchen                  22.0 μg/sf
Parlor                       39.5 μg/sf
Window Sill                 505.0 μg/sf

OK, we're all now freaking out!  The Sanitarian gave us a warning.  We have to wet sand all the chipped window sills and repaint them to seal any leaded paint present, simple, but a temporary solution.  We'll also have to possibly replace our 250+ year old window frames and sashes should the leaded paint remain detectable after being painted over (insane and also another post to come).

Once these hopefully idle threats are over, I plan to strip all the trim in the house and eventually the exterior paint.  Please, Mr. Sanitarian, GO AWAY!  Your temporary fixes are temporary and your idle threats will bankrupt us!

We're waiting to hear back from our doctor regarding our son's latest lead test.  If his numbers are very small (or hopefully nill), then we know our methods of wet moping have been successful and the Sanitarian can just.... go away (as politely as I can write here).  

Lesson learned:  Do not ask for assistance from the government.  I love my son and do not wish him harm.  But I've been reading and hearing horror stories form owners whom have gone bankrupt or lost all their savings after being forced to replaced windows, siding, etc.  Let me deal with this on my own terms since I am obviously not wealthy enough to hire a certified lead abatement crew to abate our home entirely, nor do I qualify for a government handout.  I can't even sell the home because of our knowledge of lead being present (not that I want to, mind you).  I hope this temporary fix for the State will suffice and I can get on with stripping each window clean, as a cost effective permanent solution, over time.

UPDATE:  
My son's latest BLL results are in.
*July 3, 2013: Screening = 5.4 mg/dL 
July 8, 2013:  BLL = 11.0 mg/dL
July 15, 2013:  BLL = 10.0 mg/dL
August 7, 2013:  BLL =  9.0 mg/dL
October 14, 2013:  BLL = 5.0 mg/dL
December 30, 2013: BLL = 3.0 mg/dL
June 25, 2014: BLL = 4.0 mg/dL
--January, 2015: Int. Abatement/Remediation--
*June 29, 2015: Screening = 9.5 mg/dL
June 29, 2015: BLL = 3.0 mg/dL
December 5, 2015:  BLL <3.0 mg/dL (un-measureable) 
 
*Screenings are worthless.

Wednesday, July 31, 2013

The Art of Three's

Could it be possible that the "Art of Three" is a real occurrence?  Troubling events occurring in sets of three seems magical, doesn't it?  I mean, really, why would it happen in three?  Why not four or just two; or at all?

Our home is still standing.... just wanted to get that out first.  My magical three events, in increasing importance are:

Washing Machine
Compared to the other two issues below, who cares about a leaking washer?  I care because I'm the one dishing out over $800 for a replacement.

Lupus

While in college 8 years ago, my then girlfriend (now wife, just to be clear) discovered a rash on her hip.  Being itchy, we jokingly called it her "itchies".  She went to her doctor who took a biopsy.  The results were inconclusive at that time. The doctor said that she was probably allergic to our clothing detergent.

This past January (2013), while getting a physical for our life insurance policy, a blood test was taken.  The results of the blood test saw elevated levels of protein and other abnormalities.  Being concerned, my wife visited our doctor who re-ran the tests.  The results were the same.  The doctor wasn't too concerned but ordered a second round of tests for confirmation.  With our lives busy and the doctor not concerned, we passed on the suggested round of confirmation blood tests.  

Six months later, (a week before our son's first birthday) my wife started to have swelling in her legs.  The swelling increased in time making it difficult to walk, not to mention uncomfortable.  A visit to the doctor was made yet again.  This time, because of the swelling, the on call doctor ordered a massive amount of blood tests.  They tested her blood for everything...  a couple days later, we received a call from the nurse, who, with direction from the doctor, sent her medical records to Hartford Hospital and instructed us to head to the emergency room.

There we sat, the three of us:  a nervous mother, anxious father and impatient baby/toddler; surrounded by hacking sickly persons, dangling arms, limping idiots and a scary looking ghetto person saying to the triage nurse, "The voices in my head are telling me to hurt people".

It must have been a full moon as we waited in the ER for 18 hours, seeing the above carnage yet no doctor. The city of Hartford spewed forth it's needy, all while the three of us waited for information.  The hospital, in their bureaucratic logic, would not allow us to see a specialist doctor until my wife was admitted.  Since the hospital had no vacancy, our 5-star resort stay was delayed, as was our meeting with the specialist.  

At the 24 hour mark, the three of us saw the specialist, in my wife's palatial room (it even came with the sticky floors!).  The specialist is a kidney doctor with a Donald Trump attire (yes, he had a pink tie) and he asked my wife a couple of questions.  Upon hearing the answers, he said that he's 95% sure she has Lupus.

Lupus, an autoimmune disease, affects mainly young women (teens through twenties).  Some outside environmental event, stress or virus or who knows, infects the body.  The immune system attacks this virus, naturally.  The virus mutates to appear as an organ.  The immune system eventually kills the virus but keeps going.  It attacks organs and other tissues of the body.  People with Lupus do not look "sick".  And every patient has different symptoms; for my wife, her immune system started attacking her kidneys and joints; which to a non-specialist would resemble two separate medical diagnosis:  kidney disease and arthritis.  My wife is 29, doesn't smoke or take drugs; she eats healthy and exercises.  Lupus can also become more evident after pregnancy, since we're a year past our son's birth, I can only assume his birth began her slow degeneration.  Despite what "Dr. House" may think, sometimes, it is just Lupus.

A kidney biopsy was completed to confirm the diagnosis as well as classify the level of Lupus she had.  Two days later, she was officially diagnosed with Lupus Nephritis, Class 4.  Class 5 equates to permanent scaring of the affected organ.  Luckily (I suppose), we went to the ER when we did.  According to the results of the biopsy, if we had blown this off as well, within six weeks, she would've needed a kidney transplant.

Despite the threat of needing a transplant, my wife is doing much better now but her diagnosis is for life.  More about my wife's struggles with Lupus can be read on her blog:  Bit-By-Bit.  I encourage my readers to become aware of this disease since it seemingly affects those who are the healthiest.

Lead Poisoning

Just after the diagnosis of my wife, our son's first birthday came.  Per state law, a lead screening is required.  I suppose we shouldn't be shocked (yet we were) that he came back positive for lead.  Despite our prior testing. the screening showed that his level was 5.4 mg/dL.

Per the EPA, normal is 0.0 to 2.0 and above a 5.0 requires attention.  Above a 9.0 means the doctor is required by law to inform the state.  Above 20.0, the state acts.  Above 45.0, toxic drugs that damage the kidneys and liver are administered.  Above 70.0, neurological damage occurs.

The screening is only a ball park estimate.  A blood sample was taken from our son to conduct a full blood lead test. The results came back at 11.0 mg/dL.

We are working with doctors, contractors, government programs and the bank to find and remove the lead... wherever it is.  A future post will document our struggles in greater detail (updates are here:  Lead Poisoning).


I hope that's it...

Saturday, May 25, 2013

Photogenic

I can remember not too long ago, while laying in bed off of work with a pulled back, where just by chance, looking out our front windows, I saw a suspicious vehicle parked with it's driver pointing "something" at our home.  A flash of light and the convertible Audi left.  

A quick photo of our tourist checking out her photos on her camera.  This photo was taken through our storm window's screen.


This past weekend, it happened again.  On her way home, my wife called to ask me to help her unload her car upon arrival.  As I waited for her to pull into the driveway, I noticed a gray Toyota Camary/Honda Accord with it's hazard lights on, driving slowly up a parallel street, the same street seen in the photo above.  They passed our house then stopped and rolled backward down the hill.  I thought they had mechanical problems or perhaps, God fearing, their brakes had went.  Yet, they stopped.  The driver opened his window and snapped photos of our home.  

How peculiar.  This happened last spring as well, except the driver was female and her vehicle was a dark blue convertible Audi (see the photo above).  These are the only two events that I've witnessed of someone photographing our home.  Perhaps there were numerous other times that we are unaware of.

I find it fascinating that of all the homes on our street of 18th century origins, passersby have the want to photograph our home.

I realize that I am putting a lot of information out there with this blog in regards to our home so I guess some notoriety comes with the territory assuming of course these photographers are aware of such written works of art. However, I am pleased that people find our home interesting and photogenic.  A sense of pride blossoms within when events such as this occur or when a couple walking by make a comment as well.  With as much stress as owning a 260+ year old home can be, having someone say, "I love your house!" is, well, awesome.

If you do happen to see an overweight man grunting while setting a field stone wall or screaming colorful four letter words after doing some idiotic task, like, I don't know, dropping 60 pounds of aluminum on his toe, feel free to say "HI" and chit-chat.  Despite an angry strained face or a sudden profane outburst, I don't bite.

Sunday, May 12, 2013

Hartford Turnpike

Through the hundreds of documents and maps that were sifted through while researching our home, the one lingering (of many) facts there were hard to find was our home's prior addresses.  It seems that addresses back in the 18th century were more of common knowledge of those that lived here.  Meaning, until the advent of the postal system, a person's address was more of, "o'er yer yonder", or perhaps, "a quarter mile on the right past the ol' tree".

The only potential address information I could find were street names.  I obviously know what street I live on now, but asking Town Hall of prior street names was like asking my wife's cat where he hid our sock.  

We searched through dozens of maps from online sources and the local libraries.  Eventually, I came across a map that showed a turnpike running the route of where our street is today.  The map was from the middle of the 19th century.  Apparently, it was also a major thoroughfare from Hartford southward towards Middletown.  The map titled the route the Hartford-Middletown Turnpike.  But, it was the only map to show such a route that I've ever come across.

While at Town Hall questioning her sanity, my wife met a knowledgeable police officer who knew of a stone tablet on our street that he said depicted our street's original name.  When he told her this, the snow covered land was prohibiting any such search for this tablet.  Though each time we passed around that area in our cars, we did a quick look where he had suggested, but hadn't seen it.  I kept imagining this marblesque horizontally laid, square placard chipped away by years of neglect, partially covered by overgrown grass, perhaps even cut in two like so many old tombstones in forgotten cemeteries.  

Today, we found it!  And, I was completely incorrect with the visual description.  I must say, it is in a state of great preservation and well maintained by the owners of the contemporary home which was built near it.

Hartford Turnpike, Mile 6, Runs to Saybrook, 35 Miles, Granted 1802

This monolithic stone epitaph stands approximately three to four feet tall with a bush behind it and mulch directly surrounding it.  It's located roughly a quarter mile from the border of Rocky Hill and Wethersfield on the East side of Old Main Street.

Well, there you have it, our official "Street Sign".

Thursday, May 9, 2013

Touring My Home - Possible Addition

This past month I had the pleasure of being taken on a tour of my own home by Edward Sunderland of Sunderland Period Homes.  Mr. Sunderland was showing me my home, yes, I was the tourist.  Nearly every room was visited by our tour group of two as Mr. Sunderland showcased the details of each room to his pupil.  And there were lots of details.

Before Mr. Sunderland's arrival, my wife and I were contemplating an addition, containing a garage and new kitchen with a wrap around driveway, all in the appearance of 18th century architecture.  I had received an advertisement from Sunderland Period Homes, generically, and decided to contact them for suggestions for our home.  Being a full design/build firm located in Connecticut and specializing in the restoration/recreation of colonial period homes I thought who better to give us insight.

On the Sunderland Period Homes' website, there is a video (seen here:  Collect This) hosted by MSN giving an introduction to their work.  Mr. Sunderland gives a tour of some of his client's homes.  It was at the end of the video that the twin hosts (literally) became a little cocky, joked and asked Mr. Sunderland about the costs of the homes which they toured.  The answer was between 1 and 1.5 million dollars.  After hearing that, I was fearful that this particular contractor was way out of my price range.  Let alone willing to offer free advice.  I figured it couldn't hurt to try.

I drew up a sketch of an idea (albeit, over-ambitious) and emailed it to Mr. Sunderland.  The response I received was not what I was expecting.  He personally responded and said (and I am paraphrasing) that my sketch is not historically accurate and began to dive into the why.  Basically, my Ell's conceptual window fenestration was incorrect, as was the placement of the chimney.
Rear Existing Elevation - As Is (No Addition)
Not to Scale

Proposed Side Elevation of Ell Addition
Not to Scale


It was in that same communication that he suggested a visit to our home.  Why not, I thought.  Perhaps he needed an idea for his next project and besides, I would love to pick his brain, a quid pro quo.  We scheduled for a late Tuesday afternoon.

Tuesday came.  I was so excited, like a little schoolboy.  We cleaned our home as best as we could in the days prior.  The day of, I rushed home and eagerly awaited his arrival.  I hate to make this sound like I was waiting for the President to arrive (or some hot model), we rarely "show off" our home, especially to those in the "know".  He arrived exactly on time in an old Subaru that's seen a couple of construction sites.  Quite different from the image one receives of a business owner who builds million dollar homes.

With no delay, after introductions were made, we toured the James Warner House.  The first thing I noticed was Mr. Sunderland feeling my walls.  I'm not trying to be cute.  He actually felt the paneling of my dining room. Seeing the bewildered look on my face, he said he was feeling for the imperfections made by the craftsmen as they planed the surface flat.  Unfortunately, according to Mr. Sunderland, most homes have had their woodwork sanded flat in preparation for painting in recent years.  Mine, sadly, are painted an awful green.  The sanding removes the subtle groves left by the craftsmen 200 years ago, a lost character of the home.  Come to think of it, it wasn't until the previous owner that the home's interior was painted.  Imagine that, 250 +/- years of being unpainted, then one careless owner (or deranged interior decorator) paints nearly everything AND wallpapers whatever wasn't!

With glances around each room, Mr. Sunderland was able to tell me which details were original, or not.  Thankfully, we have many original details throughout our home.  One in particular which stands out is our guest room.  Though our home's records date to around the middle of the 18th century, Mr. Sunderland looked at the details in our guest room and said that it is a transitional and a "newer" room, decorated in the Federal style.  The molding around the windows combined with the mantle points to the Federal period.  Also, the firebox seems to have been modified into a Rumford fireplace.  So, although the house was built circa 1760, the guest room was later modified to the fashion of the times, perhaps closer to the 1800 to 1810 year range, in my uneducated guess.

Circa 1800 Rumford fireplace.


Rumford fireplace, at an angle showing how shallow the revolutionary design was.

Fascinating... Warning, history lesson to follow:

Benjamin Thompson, a.k.a. Count Rumford
(1753 - 1814)
Count Rumford (born Benjamin Thompson in 1753, in Woburn MA, Count of the Holy Roman Empire after his defection to England and deeds for the Bavarian court) was a loyalist during the beginnings of the American Revolution. He left the American colonies after the signing of the Declaration in 1776. Between 1796 and 1798, he published a new method of fireplace construction. It became widely popular throughout Europe and crossed the 'pond' quickly. Along with many homes, the Rumford fireplace was installed in our home during a Federalist period decorating endeavor.  The new design lessens the depth of the firebox, making it quite shallow compared to a "regular" fireplace.  The height was increased and the throat that connected the firebox to the chimney was made more narrow as well.  The sides of the box were also made less square, angling towards the center.  This made the fire in the fireplace closer to the center of the room producing more heat and less smoke with a better draft from the narrower throat.  Better fire, more heat, no smoke, who could complain about that?

From Wikipedia.com
Moving past all the little details, towards the end of our two and a half hour tour, Mr. Sunderland and I discussed the addition. He asked a basic question: "What do you want?" Our most simplistic answer:  A larger kitchen.

We discussed modifying the galley kitchen that we have now and that really ended up simply moving cabinets around.  We were still left with a galley kitchen.  As we reached the rear of our home, Mr. Sunderland entered our enclosed porch and standing in the center, did a 360.  "Here" he said, "I would place the kitchen right here." He added he would remove the ceiling, install beams over head, a few windows, enclose the walls, put in a foundation with decorative stone to match the rest of the house, new wide plank flooring, widen the doorway to the keeping room or remove the wall all together."

Pricing was not discussed.  Well, it was asked, but Mr. Sunderland was hesitant to give forth a number without researching it first.  I'll have to wait and see what he'll come up with, though I fear my piggy bank isn't large enough for the level of detail that Mr. Sunderland is capable of.

Loosing a three season porch for a new huge kitchen... we would need to weigh the pros and cons.  We do love the porch as its shady and cool during the hot summer months. Though a new kitchen designed by someone who's familiar with 18th century architecture is quite enticing.   Another negative, though quite minor, is that I would loose my work area.  That is until I build my barn/garage.


Tuesday, April 30, 2013

Stone Wall.

Sometimes I get bored.  I'll start one project and become frustrated with how long it is taking to finish, switch to another and at some point in the future, return to the first project (sometimes not).  So when I started to take apart one of our retaining walls, my wife gave me a scared look.  Call it "deer-in-headlights".

My plan for this past Sunday was to take it easy, what with my squished foot.  Thinking of easy tasks, I ventured into the back yard.  On my way out, I passed one of our sad looking field stone walls.  The previous owner, by her own volition, wanted an o'natural look to everything which basically meant a lack of property maintenance.  She loved climbing ivy plants, the type that root into and damage wood and masonry.  This rear entrance retaining wall was covered in ivy, so much so, that it actually hid the collapsed section of the wall.  It was an eyesore.  So I spent the entire day "restoring" it.  My legs, back and every other muscle in my body can attest to it.  There's no "taking it easy" when working with stone.  I am an idiot.

Before:
Mound of English Ivy.  You cannot tell from this photos but there's a beautiful stone wall hidden underneath.


I tore out as much of the rooted ivy plants as I could.  In doing so, I was also removing the stones.  Those ivy plants dug in deep and with the wall a bit disheveled and leaning outward, eventually, I just tore apart then entire south end of the wall.

Rebuilding:
Bit by bit, I reorganized the pile of stones.  Finding the right stone to fit the corner, or face, is not so difficult, just heavy. Basically, the larger flat sided stones are for the face of the wall and any stone that has two flat faces next to each other make a corner.  All other stones are filler, either for leveling the larger back-breaking stones along the face or within the wall to add mass.  Stone dust is a wonderful filler to fill the voids.  It's similar to sand in that it's a fine material, however, it is more coarse and compacts nicely.  In the photos, the stone dust is the grayish colored "sand".  Luckily, it's the same material used to level the brick walkway.  A surplus amount of it was left around the area.  

Layer by layer, large flat faced stones were placed around the perimeter.  Behind the large stones, smaller pebbles and rocks were stuffed in.  Some stone dust was shoveled around the pebbles until the layer was flat (or as flat as came be).  I hand tamped the stone dust to get it compacted and repeated this process for the next layer.


After trial and error, I eventually got the stones to fit just right.  The shear weight of some of these stones made it difficult to continually place, rotate, remove, etc., especially as the wall grew in height.  Now since this wall was already established, I used the bottom most rows and my eye as a guide to keep the wall straight.  Though, if I were to start this wall from scratch, I would've used a reference line.  Two stakes with a string tied between them makes a great guide for laying the first stones.

I ran out of the free stone dust and was about eight to twelve inches short of the walkway elevation.  I used earth for the rest of the fill and it actually worked out pretty well. I threw some grass seed on top to help curb any soil erosion.

After:


A vast improvement to the Before images.  Notice that the stones are now leaning slightly in as oppose to out, making the wall more stable.

I am pleased with the outcome.  It was honestly my first attempt at a field stone wall.  We have another much larger wall that will need some repair in time.  I would also like to install a small two to three foot high wall along the front of our property.  Done correctly, it will last a lot longer than a rickety fence.  I just love the strength and appearance of a stone wall, don't you?