Welcome!

How we came to purchase our home.

WPA Photo

A Works Progress Administration photo offers a glimpse of our home's past.

Reproduction Windsor Chair

Finally, a dining room set.

No Power, No Heat.

Our first snow storm and it's aftermath, October, 2011.

Lead Poisoning

Updates to our son's lead levels.

Bit By Bit

My wife's blog on being pregnant, giving birth and raising our first child with all the complications, hardships and joys that life throws our way.

Sunday, July 27, 2014

RRP Rule

After the scares with leaded paint, my wife felt that it was prudent to have me take a class in lead safety, just so that I know the current standards in protecting our family from lead dust.  Doing research online, I came across many classes meant for contractors at varying costs.  Some were a week long program for heavy lead abatement (think Hollywood style HAZMAT/alien invasion with plastic rooms and space suit-like attire).  I was not about to spend a week's worth of vacation time to sit in a HAZMAT training class.  Instead, I came across a one day class that, since 2010, has been a requirement for persons to either earn a contractor's license or receive a permit in certain towns.  This one day class is for the RRP certification, or Renovation, Repair and Painting Program.  The one day class instructs contractors on how to identify potential projects where lead may be present, how to test for lead, how to inform the customer of the presence of lead, how to prepare the area being worked on to avoid the spread of leaded dust, how to protect yourself and, lastly, how to clean the work area.  The information is provided by the EPA and is taught by EPA certified companies.  Some states run their own program directly, like Rhode Island and Massachusetts.  In Connecticut, the regulations are set by the Federal government (based out of Boston, go figure?)

After having taken the course this past June, I reflected on the two separate contractors that have worked on our home. Only one of them have actually followed the RRP rules.  The crew that did (seen here), did preparatory work by the book.  The other, more recent contractor (seen here), did nothing; even after being told that there was lead present.

The RRP class is one vacation day and around $200.  You're certified for 5 years and a refresher course (4 hours long) is required every 5 years to maintain the certification.  The class was hosted by Fuss and O'Neil, an engineering company in Manchester, CT.  They, specifically, charged $190 (2014) for the class and provided lunch.  The information is public information as it is from the EPA.  Below, I have listed out the procedures that one must take when dealing with a leaded project.  These are the rules as stipulated by the EPA for a contractor to follow.  For the rules of a home owner, scroll to the end...

1.  Upon arrival to the project, ask the owner when the home was built.  If they tell you it was built prior to 1978, test for lead.  If they don't know, test for lead.  If it was built on or after January 1, 1978, it magically doesn't have lead and the RRP rules no longer apply; you may commence work.

2.  Test for lead using EPA approved test kits (seen here and here).  Document the areas tested and record the results.  If negative, RRP rules no longer apply.  If positive, inform the homeowner and provide them with a government sourced brochure regarding lead risks to children (Renovate Right).  Within 30 days of the completion of the project, a copy of the results are to be submitted to the homeowner.  The homeowner is now fully aware that there is leaded paint present.

3.  Purchase:
6-mil thick plastic sheets (100 feet x 10-foot roll is roughly $60 at Home Depot)
Contractor trash bags (again, Home Depot, 3-mill thick 42 gallon bags, 50 count for $26)
HEPA certified shop vacuum (no, not a vacuum with a HEPA filter, that doesn't count!, Amazon, $250+)
Swifter wet mops (cheapest functional)
Swifter dry mops (cheapest functional)
Duct-Tape (extra wide painter's tape is more safe for floors)
An empty spray bottle (for water wash downs)
Protective coveralls, hooded, and booties (roughly $10, per laborer per day)
Sticky pads (120 sheets for $100). 
4a.  If working on a leaded exterior, protect the ground with 6-mil thick plastic sheets a minimum of 10 feet from the building, 20+ feet when at the second floor.  A contractor is suppose to use their judgement beyond 10-20 feet, where working on a third floor, for example, may cause leaded dust to fall beyond 20 feet from the house.  The edge closest to the building should be duct-taped to the exterior to ensure no gaps.  Cover any wall openings, i.e. windows and doors in the immediate area with the plastic and duct-tape.  The plastic on the ground is to drape over all landscaping, including bushes and vegetable gardens.  Ensure that the sheets are weighed down and never work in windy conditions.  At the end of each day, use the HEPA vacuum to remove all contaminants that fell on the plastic.  The plastic sheet can be re-used, so long as it is cleaned daily, kept in good condition and not transported around the building.  Do not remove the plastic while having contaminated material on it, a risk of the debris falling out and contaminating the ground exists.

4b.  If working on a leaded interior, protect the floor 6 feet from the surface being worked on.  Cover all openings with plastic and duct tape.  Turn OFF any force air A/C or heating system and cover with plastic and duct tape any vent openings in the area.  Access to the room can be made by cutting the sealed plastic at one doorway straight down the center.  A flap is then installed (black contractor's trash bag, cut along seams works perfect) and double hung from the door frame.  Place a sticky mat at the entrance to allow removal of any dust from the feet upon exiting.  Clean up at the end of each day using the HEPA certified vacuum. Vacuum yourself before you leave then dispose of any coveralls used in a contractor's trash bag.

5.  Commence work.

6.  Upon completion, clean up is required.  Always work from the top down.  HEPA Vac the entire room.  Then, using the spray bottle, wet the ceiling surfaces and wipe clean with a white cloth.  Keep wetting and wiping until the white cloth remains mostly white.  Then go to the walls and work your way to the floor.  Once complete, carefully remove the plastic on the doorways, windows and vents and gently roll the plastic from the floor ensuring not to disturb any potential dust remaining on it.  Throw them and all the used cloths into the contractor's trash bag.  Use the wet swiffer to mop the bare floors until the white swiffer mop is no longer picking up dirt (still white after being used).  Focus on a 20 square foot area at a time.  The room should be cleaner than when you arrived.  Seal all used contractor bags using a gooseneck closure.  Dispose of in a hazmat container.  

7.  Retest for lead.

If you are a homeowner, RRP rules do not apply (go figure?).  A homeowner can dispose of leaded waste, in their municipal trash, up to 30 cubic yards!  That's insane, but legal.

There are little details here and there that are discussed in the class, but the critical issues are:
Information - be knowledgeable of what you are dealing with.
Test - test, test, test.
Protection - ensure your family (including the furry type) is safe.
Clean - make sure you wipe down EVERY surface.
Disposal - throw the leaded material, wipes, plastic, etc. out in accordance with the law.
More information can be gained from the EPA:  EPA.Gov - Renovation Repair and Painting Rule.
Saturday, May 31, 2014

4-Poster Bed

Since moving into our historic home, so much time has been spent on the physical structure that very little has been devoted to furnishing it (we still have a couple empty rooms).  Our bedroom has a hand-me-down dresser from a college friend that is packed full of our necessities, a solitary night stand from a recycling yard and a metal bed frame sourced from Craigslist.  Rather sparse for a modern bedroom yet my wife has been content (at least that's what I thought).

After two-plus years, my wife had enough.  Her birthday was arriving and when I asked for her preference, instead of the usual textile items, she blurts out FURNITURE!  My wife's wish for her birthday was a piece of furniture for our bedroom.  Having looked through sample sales of period furniture, she gave me a limit of $3,000 (as my wife and I share approval in our expenses, we do not make purchases without the other's approval).  She said that it was time we got something and whatever it was, it had to be for our bedroom.  

We sat there each night scouring EBay and other sites for authentic period pieces.  For decent period pieces, even at our limit, it was just a little out of reach.  Not to mention fears of potential leaded paint and, along the same lines, protecting an $8,000 dresser from a hyper toddler.  We decided to shy away from true antiques.

We moved on to our bed frame.  A year or so prior, our bed and box spring sat directly on the floor.  It was a habit from our former days of apartment living when buying furniture for a year-long rental wasn't needed.  Also, our cat loved clawing the underside of the box spring (even climbing inside).  Then, however, our cat matured and as being on the floor invited spiders crawling over us at night (ew), we purchased a basic metal frame and elevated our bed away from the arachnids.  Now, it was time to have a formal bed frame, no more low-rider beds in cahoots with spiders and manic cats.  It's time for a mommy and daddy bed.

$3,000 is a lot of money for most people (it's a lot of money for us as well).   I realize that we do not live centuries in the past, but I would like to stay true to the appearance of the past and there is an associated cost with that level of quality.  There really isn't any sense in owning an 18th century American home and filling it with modern Japanese art (like our previous owner).  In my opinion, for a home that a person owns, their furniture should compliment it.

In a prior post, I commented on D.R. Dimes.  Though beautiful furniture, their pricing was just out of reach.  So I searched online through various vendors for reproduction furniture.  I came across quite a few and many having the same prices close to D.R. Dimes or of mass produced varieties that just look too "modern" for our home.  I finally came across a furniture maker who's pricing is much less than that of D.R. Dimes, but still of a quality equal to the of the famous maker.

Out in Lancaster County, PA, is a furniture maker with an impressive inventory of reproduction pieces.  Their site, GreatWindsorChairs.com, shows off their collection of period pieces for every room of a historic home.  They are not IKEA-like furniture with particle board components.  Like with many things, authenticity and quality do not come from low-cost chains.  I ventured to their site, found their bedroom furniture and noted a little highlighted blurb about discounts being available.  I submitted a questionnaire through their site and soon received a call... that's when I met Michael Rice.

Michael was patient with me.  I was flopping back and forth with choosing between the available tiger maple or cherry wood construction (trivial:  both were the same price, another differential from D.R. Dimes).  In the end, I settled on the tiger maple with a canopy shipped to my living room.  Pricing was great.  Michael described to me that the discount applied to their current inventory only and returns were not possible.  They had a tiger maple king size canopy bed in stock at 10% off their regular pricing.  Shipping was through an outside delivery service for an extra fee.  All together, $2,990.50 was charged to my credit card.  Within two weeks, the bed was in my home and I came in under our budget.

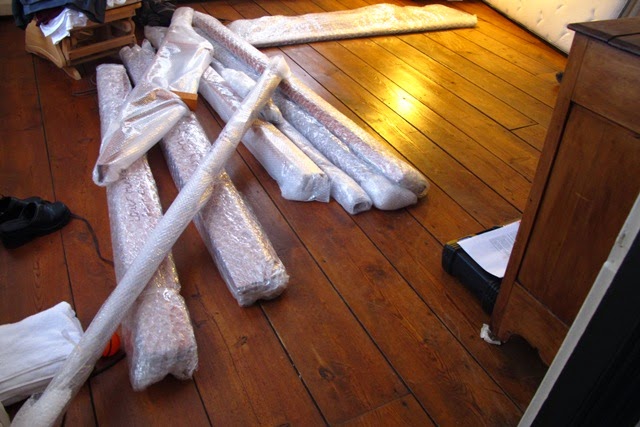
It took roughly 2 hours to assemble as each part was nicely wrapped heavily in bubble-wrap.  Unwrapping the parts was time consuming.  Once all exposed, assembly went quickly.  It's easier with two people (per the directions), but with the other able-bodied person caring for our little one, this was a one-person job.  Besides, it was her birthday...

All the parts came wrapped in bubble wrap, held together with tape.

Each bundle was labeled making it easier to grab the right part during assembly, eliminating the guess work.
Unwrapped headboard and corner posts.  I used the bubble wrap as padding.
Bolts that secure the posts to the rails.  They came with a tool to aide in installation.
Final assembly of the parts.  I had to use books to support the rails during the "two-person" stage while attaching the bolts.

The partially assembled bed.  I couldn't place the canopy on top because the finials that attach the bars are too tall for our room.

Being in an old home with (plus or minus) 7-foot ceilings, a four poster bed with 7'-4" posts was not going to fit.  Discussing the height issue with Michael, I learned that the finials can be easily trimmed.  They are basically a decorative peg about 6 to 8 inches in height that support the canopy.  No screws, no bolts; just a solid piece of maple, turned on a lathe.  I measured the clearance that the finial needed for installation above the canopy.  It's simply the length of the peg from the bottom of the finial.  That distance was measured on the top of the finial.  I drilled a hole into a price of squared scrap wood to hold the finial.  I then used a miter hand saw to cut off just enough from the finials to fit our ceilings.  The final appearance is more sedate than the original form, I actually like it better.

Removing the top of the maple finial using a common hand miter saw.

A cut finial compared to it's former size.  The removed top allows just enough room for the installation and it's appearance actually looks quite attractive.
I am very pleased with the bed frame from Great Windsor Chairs.  The quality is impressive.  It is solid maple and the "tiger" finish is absolutely gorgeous.  The bed as a whole is not 100% hand-made.  It's a hybrid of machine and hand tooling.  Considering the much greater expense with a completely hand made piece (and with a toddler around), I'm OK with a hybrid approach to the construction.  Having said that, what really is quite exciting are the details that a lay-person may over look.  On the flat surfaces such as the head board and even the canopy frame are the tool marks from the hand plane used to flatten the components!  I realize that reads a bit dorky, but those "imperfections" just add to the quality of this piece.  It truly is an heirloom to pass down and money well spent.  It also satisfied my wife.  Take a look at some of the details below:

Photographing very fine details in wood is harder than I thought.  The light has to be just right to reflect the undulations for the camera lens to capture.  Above, the bottom bar of the canopy support show the marks left by the hand plane.  Simply awesome.

Finial installed a top a corner post with canopy bars.  I think it looks great!

Lamb's Ear detail of the corner post.

Bolt cover detail.  Some manufacturers offer metal covers for an added expense, these were included and pre-installed.

Rope hole detail.  For an added touch of authenticity, a large diameter rope can be added to mimic a rope bed.  

Headboard closeup.

The king size canopy bed from GreatWindsorChairs.com.  With the cost of the bed being what it was, there was no more room left in the budget for a quilted colonial blanket.

Disclaimer:  I have not been reimbursed by Great Windsor Chairs, nor by Michael, for writing this entry.  I have received a 10% discount which is readily available to any consumer when Great Windsor Chairs advertises a sale.

Sunday, April 20, 2014

Parlor Renovation, Part II - Window Sashes

A continuation from Parlor Renovation, Part I.

It was agreed that I would strip the window sashes to save on cost in preparation for the work to be done to our southern parlor window.  It was a simple task (isn't it always?).  I purchased paint stripper, a scraper, a dust suite and a lead vapor rated painter's mask.  I setup my area in the driveway placing a disposable plastic tarp on the pavement, two horses atop and dawned my space suite attire.  I retrieved the sashes from the back porch and while carrying them to my work area, one of the rails loosened and nearly fell off.  Well, there goes stripping them...

Turns out, the bottom rail on one of the sashes was rotted at the joint and had come loose.  My tail between my legs, I called Sunderland and requested his opinion.  He felt that it was an easy fix of a job costing roughly $300.  As usual, I wanted to make sure I was getting the best price.  After he explained what that cost entailed (replacing the bottom rail and re-glazing the three bottom panes).  I told him to never mind the whole window altogether and simply focus on repairing the rot and water issue with the frame.  I sought to replace the window sashes outright.

I searched online and came across Caroline Sly of Ashfield, MA.  She is a one-woman shop and claims to make windows by hand (among other wooden assemblies including stringed musical instruments) and after contacting her, she offered to stop by and show a sample of her work.

Prior to her arrival, we exchanged emails.  We spoke of early expectations and I learned just how affordable she is.  As my readers will recall, I always say that money is a matter of perspective, so what does affordable mean?  Well, if Sunderland Period Homes was willing to repair my one lousy reproduction window sash from the 1960's for $300 plus another $400 to weatherstrip with vinyl/plastic strips both sashes; Mrs. Sly was hand-making TWO sashes, with antique glass from the 19th century and weatherstripping of a similar nature for $425 (un-painted).  $700 to repair one reproduction versus $425 for a new period reproduction.  

I'll take your silence as a nod of approval.  She's a godsend when dealing with a constant barrage of high prices.  Mind you that pieces from Mrs. Sly are a custom one, so what may be of one charge for my home, could be different for yours (meaning, you should contact her for specific applications).  Here is her site: www.CarolineSly.com.

Her work speaks for itself.  Is it perfect, no.  Is it affordable?  For us, yes.  There are little issues I have with her work, details that would annoy me tremendously if Sunderland had done it, especially with his level of pricing.  She gave her opinion with details and listened to our desires.  It took her a week to create the pair of sashes, glaze them and deliver them to our home.  The glazing was still pliable when she dropped them off.

I was hesitant on informing Mr. Sunderland of my purchase.  After all, he is working on our home and has the means and methods of creating windows.  I would not want to offend him by taking business away.  I tried to keep things simple and simply asked that we did not install the weatherstripping on the old sashes and that I'll deal with them later.

But Mr. Sunderland kept on badgering me about the window, that it needs to be repaired or it will not function correctly, etc.   He was right, of course, yet, his pricing is just out of reach for my sanity.  In the end, I relented and confessed the real reason for foregoing the repair of the old sash.  Once my secret plan came to light, Mr. Sunderland really didn't say much.  He didn't seem to mind at that time and I invited him to examine the new sashes. 

Sunderland Period Homes strives for perfection in the details, at least that's the impression.  So, it wasn't until several weeks later that Mr. Sunderland felt compelled to give his full opinion of the sashes.  He examined the window and began pointing out all the inconsistencies in workmanship as well as the structural integrity of the window.  He said that the rebates for the glass were too shallow and that the panes of glass would fall out in time.  He added that the sashes were over tightened while being assembled which warped the sash.  He continued on for a short while, honestly aggravating me quite a bit.  I cannot afford to have Mr. Sunderland do as he pleases on my dime.  I'm not a wealthy person, I'm simply a family man paying my bills with an interest in historic homes.  So, with whatever little extra income we have goes towards our home.  If the expense is too great, something has to give.  I'm not a bottomless pit...

In retrospect (and I'm not an expert) I find it a bit hard to believe that a joiner from the 18th century would have made such perfect sashes by hand with wood sourced from one's backyard that would've passed Mr. Sunderland's critique.  It's been a while since that discussion and I am still annoyed by it.  I'm sure he's also annoyed at me for telling him that he's just too damn expensive for us, literally.

These sashes may not be perfect, but you be the judge.  Do they live up to your expectations?  Here are some closeups as they looked when Sunderland saw them:


The left sash is as Mrs. Sly delivered it, fingerprints and smudges from the glazing process present (so what?).  The right sash was cleaned and prepped for painting.  I think I am satisfied.

Mrs. Sly is due to come back to install the weatherstripping and fitment within our frame.  As of this posting, our agonizingly slow repair is as a result of yours truly having other priorities (a.k.a. LIFE) getting in the way.  As an update can be made, I'll post it up.

UPDATE:
Miscommunication, one of the most annoying things in life.  Between the window sash ordering, scheduling, dealing with Sunderland Period Homes, the lead problems; I must've misunderstood Mrs. Sly when she and I discussed installation.  She was unable to install the window sashes due to age (70+ years to her credit).  So I sit here completely beside myself since the promised windows were delivered without weatherstipping pending installation (hence my assumption of her installing them).  Well at least the price of the window, as is, is still more affordable than a repaired replica.

Wednesday, February 5, 2014

Dining Room Area Rug

With our parlor currently being renovated (very slowly), and there is only one other way to get to the back of our home, our dinning room is getting quite a bit of foot traffic.  I've become concerned that our old floor is being beaten more than required.  On top of that, our toddler has been running around the room playing and wrestling.  My mind goes crazy the level of damage that can be done to these unprotected pine floors.

My wife and I have been on the lookout for rugs locally and from various other online sources.  I came across the "souvenir" shop at Colonial Williamsburg and found the Leaf Green Garden Maze area rug (seen here).  We liked the look of it and as it was designed based upon a sample from Colonial Williamsburg's archive is a major plus.  The manufacturer is Capel Rugs and is constructed of 100% Olefin.  
I know what you're thinking.  What is Olefin?  I had no idea until I looked it up.  It's a synthetically made fiber that has several advantages.  It is abrasion and fade resistant and also resists water & mold.  Hence why this rug can be used both indoors and outdoors.  Cleaning up is much easier than on a "normal" carpet but I can imagine that fluids would pass through it much more quickly than other materials.  

An important note on historic rugs.  From my understanding (which is limited), rugs were of two types in the 18th century, if used at all.  There was the braided type in ovals and circles and then there was the canvas from sails.  Sails were woven canvases of hemp or flax sheets.  Obviously, Olefin would never have been found in an 18th century home (it was invented in the 1950's).  It's woven appearance is similar to a thick canvas, like a sail.  Texture-wise, it takes some getting used to but with it having the appearance of a sail-like material, it fits well with our home's historic details.  Also, there is no pile, just a flat non-fuzzy canvas.

The internet is full of various prices for the same exact item.  I searched and searched and found this source: Brick House Rug Center.  The shipping was free and took less than a week from their warehouse to CT.  It came wrapped in a thick plastic sleeve, but was compressed during shipping/storage and has ripples from the folds.  In time, these should flatten out.  The rug came with a cleaner from the manufacturer as well as a non-slip pad (needed as this rug is slippery on a wooden floor).

And one last bit, the coloring from the seller's site, as well as that of the manufacturer show more green tones.  The carpet I received seems much lighter being a mixture of green and white.  I'm not sure why, with exception to computer screen coloring.  Maybe there was an error in shipment/manufacturing or perhaps this is what it is.  Below is a comparison with the coloring of our pine floors.  The difference is not too far off to make us cringe but is a bit of a let down.


Wednesday, December 25, 2013

Parlor Renovation, Part I

August 4, 2012...

"OK!  I know it looks bad, but it looks worse than it really is.  I swear!"

That's the only thing I could say to my wife when she came into the parlor.  It's only a hole in the wall, right?  A frown, and the look of "what did you do now" was the kindest of greetings one could receive...

From the survey of our parlor, a rubber-cement glued wallpaper could be seen hiding the water damage plaster underneath (thanks to the previous owner).  As I peeled away the God-awful wallpaper, I opened a can of worms....the wallpaper was holding together the damaged plaster underneath.  In my unknowing nature at that time, the "loosened" plaster fell out and I had continued to remove what I had thought was damaged plaster resulting in a gaping hole in our exterior wall.

Before , left:  Rubber cemented (and painted) wallpaper.         After, right:  Wallpaper removed, punky plaster exposed.


Wallpaper removed, "loose" plaster gone (lathe saved) and the window trim removed (some damaged), I found myself dug deep into a pit.  My knowledge was limited, my hopes high.  I wanted to do the work myself, pride took the better of me.  I continued to knock "loose" the surrounding plaster away.  In the end, I was left with an annoyed wife and crushed pride.

More wallpaper being removed, wetted areas are now visible below the window.


Without the knowledge to repair my deeds, the wall sat there for the remainder of the summer, fall, winter, spring... yes yes, and then summer.  I must have sub-consciously buried the plan to have it fixed for each time I said out loud to my wife that I am busy and can't do this or that right now, she would interject and say, "Like the hole in the wall?" It was painful to have to be reminded of my error or lack of ability.

I removed the wall paper entirely, along with the two sashes, sill, molding and punky plaster.  Notice the solid piece of wood at the window sill height that is where the original chair rail would have been.
August, 2013...

I had a plan (in my head).  I needed to learn how to do repairs on my own home yet books only showed vague interpretations of other jobs but I am a visual and hands-on person.  My plan was to contact Mr. Sunderland of Sunderland Period Homes.  I had the idea that since he's employed several talented persons, perhaps I could hire but one to show me how.  I wanted to learn how to do this and that and thought that perhaps I could "rent" one of his carpenters or plasters for a day to show me the ropes.  An email was sent off.

View from the southeast corner of the home towards the west.  The window is just west of our coffin door.  Notice the slight bump that is just below the window.

South exterior wall.
South exterior wall, window and coffin door.
Mr. Sunderland was confused by my questions and request.  He asked to come over and I can surmise that his trip was to evaluate a future job as oppose to a learning experience for the home owner.  We spoke of several topics while he was at our home including making our coffin door functional, adding a chair rail, siding, identifying a possible structural issue below the window... oh, and yes, the window and plaster mess yours truly created.  The idea of instruction was thrown out the window very quickly as Mr. Sunderland was too confused (perhaps on purpose) to follow.  So, we discussed how he would repair the window and bring it to new (along with the aforementioned items).  As I walked Mr. Sunderland to his car, we discussed a budget.  After pricing out how much a new window was from a few sources, to include the sashes and frame, (minus installation) I figured that a repair for such a window would surely not cost anywhere near the estimated $2,000 for the uninstalled package.  Considering our finances, my wife and I decided that $2,000 seemed a reasonable maximum amount to repair that plaster wall, reset the window sashes and stop the water leak.  Mr. Sunderland nodded as if he understood, yet said that it may be a bit more.  It was a one hour chat and an email to follow within the week that blew my mind, and not in a good way.


Here was the estimated total (are you ready for a jaw drop?):  $6,800.00

My mouth dropped open, I even imagine a bit of saliva dribbled out as I was dumb struck.  My wife had to cover my child's ears as, in my delirium, extraordinarily colorful words expelled from my drooling mouth to such extent that my opinion of Mr. Sunderland dropped dramatically.

I emailed/called Sunderland Period Homes to explain to me why it would cost nearly $7,000 to fix a leaky window and patch the plaster?  Here was his response, in layman's terms:

$2,600 is for the chair rail restoration.  The rail had been removed by a previous owner and replacing it would bring the room back to an original appearance.  The cost included the materials and labor which involved scribing the wood chair rail to match the uneven plaster wall along three walls (the fourth being paneled).  I'll pass on a scribed chair rail, saving myself 30% of the estimate upfront.

$600 is for removing paint from the existing reproduction sashes on one window.  Ah, thanks, but I'll spend a few hours over a weekend doing that myself...

$400 is for weatherstripping the two existing reproduction sashes.  What?!  It costs less than a dollar a foot to purchase!  There's no way that labor could be that expensive!

$3,200 is for (quoted from the estimate):

  1. Flash the header window with lead.
  2. Attach wood lathe properly under the window.
  3. Plaster over existing lathe.
  4. Re-install sash and window trim.
  5. Remove exterior storm window.
  6. Strip paint from exterior window frame.
  7. Restore shape of exterior sill.
  8. Remove siding at left, right and beneath window to assess condition of sheathing.
  9. Install new 30 lb. tar paper around and under window.
  10. Install "ice and water" for water proofing around window.
  11. Caulk edges around window frame and re-install siding with rosehead nails.

In addition to the above items, he wrote up an estimate for "custom made interior storm windows" to replace the exterior aluminum units currently installed, restore the clapboard siding and restore the coffin door.  The other estimates combined grossed around $46,000.  All I wanted was to stop the water leak, but at least I can see where Mr. Sunderland's pricing is in other aspects.

I bit the bullet.  I signed a contract with Sunderland Period Homes for the $3,200 + (and yes, plus the outrageous $400 for weatherstripping).  I must seem insane to you, honestly though, I have a reason.  After asking for references, I spoke with a few of his former and current clients.  They all shared one answer.  He is insanely expensive, but he gets the job done right once.  This gave me an idea.  I figured, if I am paying an excessive amount of money for this small job, why not be present, mentally record what would be done and, replicate it on the other 20+ windows that need some sort of repair.  The work will be done for me and I'll be educated in how it's being done by a qualified crew.

My readers, when the job is complete, and time allows, look for a how-to for waterproofing and restoring a leaking 250+ year old window and frame (to be updated in 2014).

Side note (but important):  After the fiasco with my son's lead levels, I decided to take a sample of the underlying paint from our parlor's newly exposed surfaces.

D-Lead test samples.
The test came back negative.  It is assumed that while removing wallpaper, I had inadvertently released this trace amount of lead into the air.  I can rule out this room as being a cause for the lead in my son's system.  See this post:  Lead Poisoning, for the full story regarding lead issues.