Welcome!

How we came to purchase our home.

WPA Photo

A Works Progress Administration photo offers a glimpse of our home's past.

Reproduction Windsor Chair

Finally, a dining room set.

No Power, No Heat.

Our first snow storm and it's aftermath, October, 2011.

Lead Poisoning

Updates to our son's lead levels.

Bit By Bit

My wife's blog on being pregnant, giving birth and raising our first child with all the complications, hardships and joys that life throws our way.

Sunday, December 23, 2012

Hurricane Sandy Damage.

OK, let's be honest.  We're fortunate. We don't live in NJ or near the Atlantic Ocean. We did experience strong winds but our 260 year old home withstood the winds without an issue. We never lost power nor had flooding.  The worst thing that happened was a few sections of our rear property fence fell down. Not a big deal, unlike our fellow antique home owner/blogger from the Enos Kellogg Homestead who now needs to rebuild their barn.

Like my fellow blogger, I too am now facing a rebuild.  Not a barn of course (I should be so lucky to have our original barn still present) but of our fence.  After cleaning up the fallen panels, I noticed that the vertical posts were completely rotted (read that as completely missing). Several pickets were torn off by either vandals from our backdoor "neighbors" or the neighborhood cats. It was only a matter of time before that fence needed to go.

For the rebuild, I've got many choices to choose from:
1.  Replacement in-kind (least labor involved). 
2.  Vinyl (God-forbid). 
3.  Chain-link (might as well get vinyl).
4.  Concrete liner (looks promising, see below).
5.  Original field stone (back breaking).
As with everything, pricing and labor must be evaluated and in time I'll post up our final decision. 
Yes, that's a concrete wall.  From CustomRock.com, not an endorsement, just credit.

Sunday, December 16, 2012

Boiler Efficiency and Home Heating

This is a long post so I put a quick summary in the beginning.

Edit: I have made corrections to my initial post on Boiler Efficiency from 10/21/2012 as a misunderstanding in heating terms has resulted in invalid information. My apologies to my readers and thanks to Lou of Cromwell Energy, Inc. for pointing it out to me.  The following has been re-written entirely to account for the misunderstandings.


SUMMARY

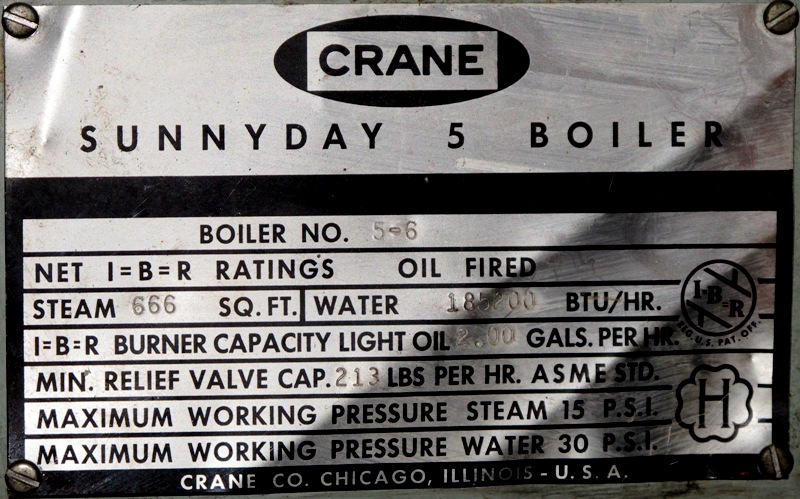
Our boiler was recently rated at 72% combustion efficiency.  New boilers start at 85% AFUE efficiency and high-tech units are at 91+% AFUE. Thermal efficiency does not equate to AFUE. Much older systems do not have an AFUE rating so one must be approximated in order to compare an older unit to a brand new one. Our boiler is currently running at 61.2% AFUE (est) with an output of 185,200 BTU/hr.  One must compute the heat-loss for a home to properly size a new boiler. I've computed 78,410 BTU/hr using a program called Hydronic Explorer (see below for details).  After sizing a new boiler, the pay back period is  around 7 years for a high end Buderus GB125BE/30.  There are numerous models to choose from and likewise, pricing will vary accordingly resulting in much shorter pay back periods.  An Excel file was created to adjust different installation scenarios to find the best rate of return.


Background
Crane Sunnyday 5 Boiler Circa 1960's
Everything started on October 19, 2012, when we had a visit from our oil supplier.  We have a two year service contract included as an incentive to sign up with oil delivery from them and that day was our annual service visit.  The visit lasted roughly an hour as the technician performed the annual maintenance on the boiler.  The following were performed and noted on the receipt:

1.  Oiled Motors
2.  Oiled Circulator
3.  Cleaned Controls
4.  Cleaned Burner
5.  Cleaned Boiler
6.  Cleared Smoke Pipe
7.  Changed Nozzle
8.  Changed Oil Filter

Exhaust temperature was 540degF and the all important combustion efficiency at 72%.

Combustion efficiency is derived from a couple of temperature readings that the technician takes. The readings are taken while the boiler is running and turned into a ratio with the resultant number being a percentage.

AFUE is a more complex ratio which takes into consideration other factors.  Factors that represent a more real life efficiency.  While trying to understand the difference myself, I came across this article:  Cornell University, Home Heating Systems.  In it, the author, Mark Pierce, uses an analogy that easily allows the reader to comprehend the difference between what the technician tells you during the annual maintenance and what AFUE is.  He quotes the Consumer Guide to Home Energy Savings:

Combustion efficiency is like the miles per gallon your car gets cruising along at 55 miles per hour on the highway...(while)...AFUE is like your car mileage between fill-ups, including both highway driving and stop and-go-traffic (Wilson & Morril, 1996, p.58).

It's the AFUE rating that one sees most often when shopping for a new boiler.  But, I did not  know what the AFUE is for our boiler.  Being built in a time when such numbers weren't used, I was left searching the internet for comparisons   There were numerous articles and forums indicating that there are no equations to convert from the combustion efficiency percentage to the AFUE percentage since each is found through a different method.  However, this article from Cornell did reveal a simple equation for approximating the AFUE of an old system made before the AFUE rating became a standard number on modern units.  The equation is this:

(Combustion Efficiency) x (0.85) = AFUE est.

I am curious to know if any of my readers know their actual AFUE and have had their Combustion Efficiency revealed during a recent service.  Do the math, see if the above theory is valid.  I hope it is because the remainder of this post is based nearly entirely upon that one simple equation.  Fingers crossed...

Since I have a combustion efficiency of 72%, the estimated AFUE of my system is:

0.72 x 0.85 = 0.612 = 61.2%

My understanding of these percentages is that for every 100 gallons of oil used, 61.2 gallons are used for heating and the balance (38.8 gallons) escapes up our chimney in the form of heat and gasses.  New boilers run in the 84%+ range leading me to believe (and also from the opinion of the technician) that it is time to consider a new boiler.

First things first.  I need to have a heat loss calculation done on our home to find out what size boiler I would need.  Currently, our setup is a circa 1960 Crane Sunnyday 5 boiler with a direct water heater.  Meaning that when I turn on the hot water, the boiler turns on as if it were heating the home, yet only heating water for the faucet.  We have a single 275 gallon oil tank.  With the fuel economy from the technician,  we'll run out of oil after running the boiler for 183 hours straight.  It's important to remember that for every hot shower, regardless of how hot we make the temperature, the boiler kicks on.  When we wash the dishes, it's on, likewise, when we wash our son's soiled clothing, it's on.  After you turn off the hot water tap, the boiler still runs to replenish the hot water that is no longer in it's reserve.  The boiler's burner is much larger than a water heater's, so right there is an improvement I can make to save on oil.  As our current boiler is sized at 185,200 BTU/hr, lets see what size heating unit I need to just heat the house.


Scouring online found a free program from a manufacturer called the Slant/Fin Corporation.  They offer (or had offered) a downloadable program that will compute for you the BTU/hr heat loss of your home based on room dimensions, number of windows, what's above and below each room, etc.  It takes time to enter all the information in and you will need to do a lot of measuring to get the data for the program.  You can download the program from HERE (172 MB zip file containing the program Heat Loss Explorer 2 and two PDF files for product literature and a user guide for the program).  I only used the program for the information, disregarding the need for their product's literature.  For the Outdoor Design Temperature, I used the table from  Comfort-Calc.net.

Crane Sunnyday 5 Boiler Specifications


The numbers from the program revealed that my home's BTU/hr heat loss is:  78,410 BTU/hr.  If we were to get the same exact type of boiler, one that has a direct water heater, then our new boiler would have to be in the 128,000+ BTU/hr size range.  Big difference, isn't it?  If this program is accurate, then our Crane Sunnyday 5 Boiler is way over sized at 185,200 BTU/hr.

Lot's of information so far.  We know that our boiler is antiquated, inefficient and over sized.  I have a lot of information.  I need to put it all together and figure out what our savings would be if we replaced our antique boiler and how long it would take to return on our investment.


Savings Calculation - WARNING, MATH OVERLOAD

As of October 17, 2012, the cost per gallon of heating oil from our supplier was $3.899 (compared to regular gasoline at $4.019).  New oil boilers have an efficiency at 85% with high end models pushing just past 93%.  Lets go crazy!  I want to see what our savings would be if we got the best of the best of the best.  Worst case scenario for upfront costs.  Given our 275 gallon tank, currently:

At 61.2% AFUE:
0.612 x 275.0 Gal. = 168.3 Gallons used for heating of the 275.0 Gallons purchased.
275.0 Gal. - 168.3 Gal. = 106.7 Gallons wasted.
106.7 Gal. x 3.899 $/Gal. = $416.02 thrown out the window (well, really up the chimney).

According to Energystar.org, the most efficient oil-fired boiler is the Buderus GB125BE (found on on this Excel list:  EnergyStar.org).  It's AFUE is at 93.4%.  Very impressive compared to our meager 61.2%.

At 93.4% AFUE:
0.934 x 275.0 Gal. = 256.9 Gallons used for heating of the 275.0 Gallons purchased.
275.0 Gal. - 256.9 Gal. = 18.1 Gallons wasted.
18.1 Gal. x 3.899 $/Gal. = $70.39 wasted.

From 61.2% to 93.4%, per a full tank fill, we would save:
$416.02 - $70.39 = $345.63 per full tank!

Last winter was a gift from mother nature.  The October snow storm (seen here) was a fluke, but the following winter was quite mild compared to previous seasons (according to the locals).  We spent a little over $4,053 heating our home and using hot water from October 2011 to October 2012.

OK, so let's say that we actually did purchase a Buderus last year.  How much would we have saved assuming of course that the price of fuel did not change?

$4,053 / $3.899 Gal. = 1,039.5 estimated gallons used.
1,039.5 Gal. x 0.612 = 636.2 Gallons actually used for heating and hot water.
1,039.5 Gal. - 636.2 Gal. = 403.3 Gallons wasted.

So, with the Buderus GB125BE installed:
636.2 Gal. / 0.934 = 681.2 Gallons purchased
681.2 Gal. - 636.2 Gal. = 45.0 Gallons wasted

The difference between the two wasted amounts would equate to the savings.  So:

403.3 Gal. - 45.0 Gal. =  358.3 wasted gallon difference.
358.3 Gal. x $3.899 = $1,397.01 savings per year!

When will I make my money back?  Finding out the price of these boilers is not easy, vendors don't like to reveal the costs of labor and parts.  So, going online yet again is my only source...

Buderus GB125BE with LT-Series Water Tank 

The Buderus GB125BE has an advertised priced online from one source (I am hesitant to post the actual site since I do not know if they're a reputable source) and I know that I need at least 78,410 BTU/hr to heat our home.  If I match the exact rating, the boiler will always be running, if I go too high, it'll use more fuel than needed to heat the volume that I have.  I'll need to over size the boiler slightly.  It was recommend that the over sizing is dependent upon the township/city that one lives in.  For my area, I believe that the over size is at 30% increase for permitting.  This would equate to approximately 102,000 BTU/hr. The closest matching Buderus is model GB125BE/30 at 100,000 BTU.  It is listed costing $6,018.95.  Wow, that is quite expensive.  Plus installation, right?  And since this boiler will not be directly heating the hot water at the tap, I'll also need a comparable water tank.  Let's just assume for argument's sake that the water tank will cost around $1,200, and the installation for the two units will be around $2,000.  Together, that's:

$6,018.95 (Buderus GB125BE/30)
$1,200.00 (est. water tank)
$2,000.00 (est. labor)
$9,218.95 (holy crap!)

So, how long will it take us to make our money back?

$9,218.95 / $1,397.01 = 6.6 years = rate of return.

Basically, a 7 year period of time is needed before I would start seeing a return on my investment.

Everything I've just gone through is speculation.  Sure, this can happen, and that; one may also have a relative that's licensed that's willing to install the boiler for free.  Because of all these variables, it is quite possible that the rate of return is much shorter.  As such, I've created an Excel data sheet that I can plug in all the information and have it spit out a payback period for various different scenarios. Below is a download link for the excel file should you like to play with it.

Download Here.
(If a password login page pops up, click cancel and the file should still open)

For now, I'm still on the mends as I try to find the best price for the most efficient boiler I can find.

Due to the amount of spam comments from oil service and repair companies that this one topic has generated, I am forced to turn off all comments on this post.  Should any reader wish to contact me, please do so on the "About Us" tab at the top of the page.

Tuesday, December 11, 2012

Our Trees Leave!

Fall is a wonderful time!  I love it.  Allergies are little, the temperatures are moderate and cool, and with the season changing, the colors are a delight.  As the season comes to a close, those delightful colorful leaves turn brown and fall to the ground.  We have several mature trees surrounding our property.  Mature trees give a huge abundance of foliage.  Both in the air and on the ground... in Fall.

As our town has curbside leaf pick up, our seasonal cleanup is made much easier without having to bag our fallen leaves.  All we need to do is pile the leaves on the curb and each month the town comes by with a massive vacuum and sucks them up.

Last year, I spent each day after work raking, raking, raking.  The rake was small and splintered.  The handle had a split in it so each time I would pull on a large pile or hit a snag, the wooden handle would pinch my skin.  Raking a half acre was quite painful leaving my hands looking like I just tackled a chupacabra.  At that time, we did not have the tools we have today.

This will seem silly, but I figured I'd make a post about it since I have a bit of pride in accomplishing this task for the first time as a home owner.  So here we go.... the essential tools required for leaf removal from one's property:

No. 1:  A decent rake!  Yes, yes, a simple device, but a device that can cause a headache if undersized or in need of repair.  For less than $20, you can get a big-box store rake that's wide and perhaps of the unclogging type.

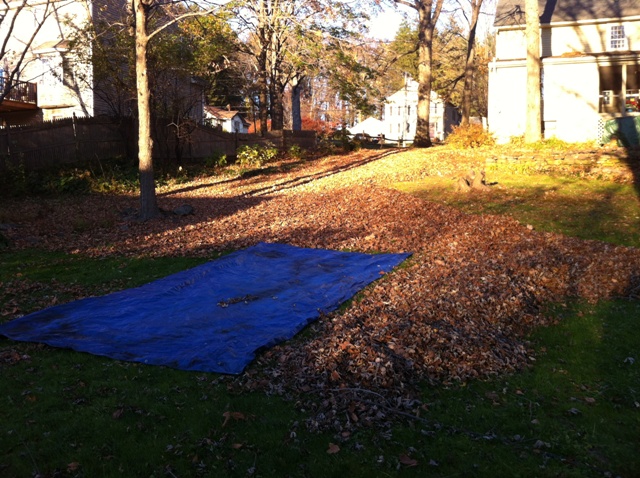
No. 2:  A big strong tarp.  The bigger the better.  The one I used cost me $25 from Ace Hardware and is 12' by 25'.  I had purchased a previous one from Walmart.  Was it cheaper, yes.  Was it worth it, no.  It was $12 and low quality.  As I hauled a pile of leaves with it, the handles broke off and yours truly received a swollen bum from the ground.

No. 3:  A leaf blower!  This can help save your back.  Constantly twisting with a rake can cause back pain and heaven forbid, pulling your back out.  The blower can move a large amount of leaves without placing as much strain on your back as raking.  I have an older one that my father-in-law handed down.  It's bulky and ironically contributed to me pulling my back out last month, but that's due to my own stupidity (don't be macho).  Gas modeled leaf blowers are typically a two cycle engine.  They require an additive of oil which you can actually buy at Walmart... go figure.  Always follow the directions.  Electric blowers are cheaper, lighter, but are less powerful.  Purchase (or borrow) one that suits your needs and budget.  Always wear ear and eye protection.  Gas powered blowers are loud and blow air at speeds equal to a Category 5 Hurricane (150 mph), throwing fine debris around.  Safety first.

Here's the routine.  Starting from your property's perimeter, blow the leaves towards the center making one pile.  If you have a huge amount of leaves, like I unfortunately have the "privilege" of having, make slightly smaller plies throughout the yard.  Work your way around the property making piles (or a pile, as the case may be).  Use the rake to get to the areas that trap leaves like shrubs and decorative grass.


With curb-side leaf pickup, all I need to do is pile up all the leaves long my curb and a vacuum truck comes by sucking them up.  Getting my mass of leaves to the curb is where the tarp comes into play.  I place the tarp next to a newly created pile and rake the leaves onto it.  I then simply drag the tarp to the curb, roll the tarp over upon itself pulling one side over the other and walla!  A mountain of leaves on the curb.

A note regarding leaf blowers.  You can go crazy with them.  There are handheld units in both electric and gas, back pack units and walk-behinds.  Likewise, there are inexpensive and expensive units.  

In the future, I hope to be able to make a mulch pile in the back yard.  With grass clippings and dead leaves, I would have a very fruitful smelly pile of mulch for a future garden that my wife and I are trying to figure out.

Friday, November 23, 2012

Woodworking, Part I

I wouldn't say I have a fear of loud noises, but when I hear the power come on a table saw or even the vacuum, I become paranoid.  In fact, my wife spooks me while I am vacuuming.  Putting psychology aside, I've come to appreciate the hand made creation of our home and the furnishings from it's time period; so much so that I would like to get my hands dirty, so to speak.

In a prior post, I mentioned a company called D.R. Dimes (A Lack of Furniture).  As if it weren't already apparently obvious, given a new child (our first) and a "money pit" of a home, purchasing reproduction furniture of such a high price tag will not be possible.  Instead, and I am going out on a limb here, my future plans are now to make the furniture pieces myself.  After talking with my fellow co-workers, I received that look.  We've all seen it (or given it).  The look only a sympathetic parent can give to their struggling child, "...oh isn't that nice" with an underlying meaning of "yeah, good luck with that, ha!"

My lovely wife has gone along with my new ambition.  For my birthday this past October 19, she purchased a woodworking class at the Connecticut Valley School of Woodworking.  The class was called Practical Handtool Joinery with Will Neptune.
The basis for all joinery is the ability to work to layout lines with saws, chisels and planes.  To do this, your tools must be properly prepared and sharpened.  If you are frustrated with the results you get with hand tools or doubt that you can improve the fit of machine cut joints then this is the class to improve your skills and take your woodworking to the next level.
In this class you will learn a controlled and repeatable method for sharpening edge tools that will cut end grain cleanly and accurately.  We will tune up and adjust rabbet and router planes so they can be used for accurate joinery.  Then in a series of bench work exercises, beginning with accurate layout techniques, you will learn how to work from reference surfaces to hand cut accurate joinery, usually more quickly and accurately than you could by machine.  These exercises include half laps, bridle joints on curved rails and housed tapered (sliding) dovetails.  This is a chance to practice working with chisels and planes and hand saws with one of this country's master furniture makers.  You will need certain tools - including a rabbet (shoulder) plane and a standard size router plane.  The full tool list can be seen on the school's website.  Don't let handtools continue to frustrate you - sign up today.
-From the Connecticut Valley School of Woodworking, Section 102712A description.
Prior to the class, I purchased a set of four Stanley Sweetheart Chisels, a Wood Is Good 18 oz. Mallet and thanks to my enrollment at CVSW, 10% off a Lie-Nielsen Router Plane.  As it turns out, the Lie-Nielsen company is your Mercedes of wood working tools, not very cheap, but a quality tool.

 The class was truly enjoyable.  I learned how to make the joints mentioned above.  The instructor, Will Neptune, is a fascinating teacher.  I highly recommend this class should the reader wish to travel down my path.  However, due to time restraints, not all components of the joints mentioned were completed with hand tools.  But I was really excited and convinced my wife to allow me to buy more tools while I dove into reading and watching articles/videos on making other joints.

A fully fledged dovetail joint was not apart of the class, but it was the one joint that all woodworkers aspire to master.  A dovetail is the joint most often seen on the sides drawers from 18th century furniture and the corners of boxes that often distinguishes quality from everything else.  Here's an example from Boston's Museaum of Fine Arts (from Newtonwoodworking.com).  


After the class, I purchased a dovetail kit from Woodcraft (which also gave a 10% discount due to the class) and found numerous how-to videos on youtube.  Combining them with the techniques I learned from the class, I made my first attempt at hand made dovetails:


Not perfect, but doable.  Next step is to simply make a box.  Then progress from there to eventually make a dinning room table and then reproduction windows in our home... but patience is key, stepping stones are important.

$ 99.00 Stanley 78 Rabbet Plane (new vintage from eBay, info on plane)
$791.29 Ouch!

I'd better stop buying tools for the time being and make something for my wife.

Saturday, November 17, 2012

Overwhelmed.

It has been a little over a year since we've moved into our home.  Has it been a great year?  No, not really.  Are we ready to call it quits?  No.  I will not let our 260 year old home get the better of us.  I am, however, just now beginning to feel overwhelmed.  

It's simply impossible to blog of all the events that have transpired in this year, so in a quick synopsis:  Windows, insulation, grass, leaves, money, wood, spiders, egg sacks, trim, molding, mold, heating, drafts, cracks, lighting, floorboards, furniture, decorations, the mid-life crisis motorcycle "gang", tools, money, contractors, crying baby, my lovely yet nagging wife, wind, a hole in the wall, money, a meowing cat in the middle of the night, vehicle maintenance, my know-it-all father, groundhogs, a pulled back (times 2), work, cobwebs, time, vent fan, trees, electrical, kitchen, washer timer, dryer timer, fireplaces, grubs, visiting family, plaster, foundation, the punk with the annoyingly loud low octave muffler, cooking stove, mice, beams, water leakages, neighborhood vandals, mega snow, heating oil, ghosts, oh, and money.  

There are so many things to do and so little time to do it in.  With our child and our jobs... now the clocks are set back, days are shorter.  The weekends are filled with other errands and our home sits patiently waiting for this and that.  


I look at our home with sadness.  It deserves better.  I say that because I lack the experience and knowledge to do the job right.  I dream in fear of repairing one aspect of this home only to have it worse off than before I touched it.  And the list of things to do increases each time I look around.  I am so hesitant to do anything except the little things that a weekend warrior does... realistically, that's cutting the grass and raking leaves... yey...


But honestly, I can read dozens of books on this and that and still be hesitant on completing any task.  Sometimes I feel as though the weight of this house is on my shoulders, like a growing elephant in the room.  Forgive the juvenile irony and insensitive humor of the photo, throwing political correctness out the window, I couldn't resist. While being gloomy all weekend, it made me smile.

So here I sit, counting the cracks, making wish lists and watching our checking accounts.  I know full well that what ever I think I want to complete, may not be.  It's not motivation, it's fear.  So, I'm putting it out there, right in the open.  I NEED HELP.  I feel as though I've been driving with my wife; thinking I know where I am going, gloating at that fact even.  Until, that is, I realize that I have no idea where I am, and am forced to ask for directions.

I need a mentor, a guide.  Someone who doesn't expect financial gain by helping a fellow lover of antique homes.  Someone experienced and wanting to share in the "love" as it were.  I don't know where to start... what tools are needed... materials to use... resources to collect.... contractor to hire... stores to visit.  Like many, I would hate to waste money on doing things wrong or paying the price for a "specialist" contractor.  I don't mind doing the work myself, but I just don't know what to do.

So I ask of my readers, if your honestly an experienced expert willing to mentor, use the comment form below or email me at confessionsofanantiquehome@gmail.com.  What is ironic about this is that most of you reading this are just like me... so I am preaching to the choir.  My fellow readers, I am not giving up!  I am venting at the frustration that has been this year.